
The inspiration comes from seeing all those cute colorful fabric letters at Anthropologie. And from watching Cougar Town. I'm sure if you're a big fan like me you've noticed the letters that spell out "EAT" in Jules' kitchen. LOVE them. So I came up with my own {FREE!} version:
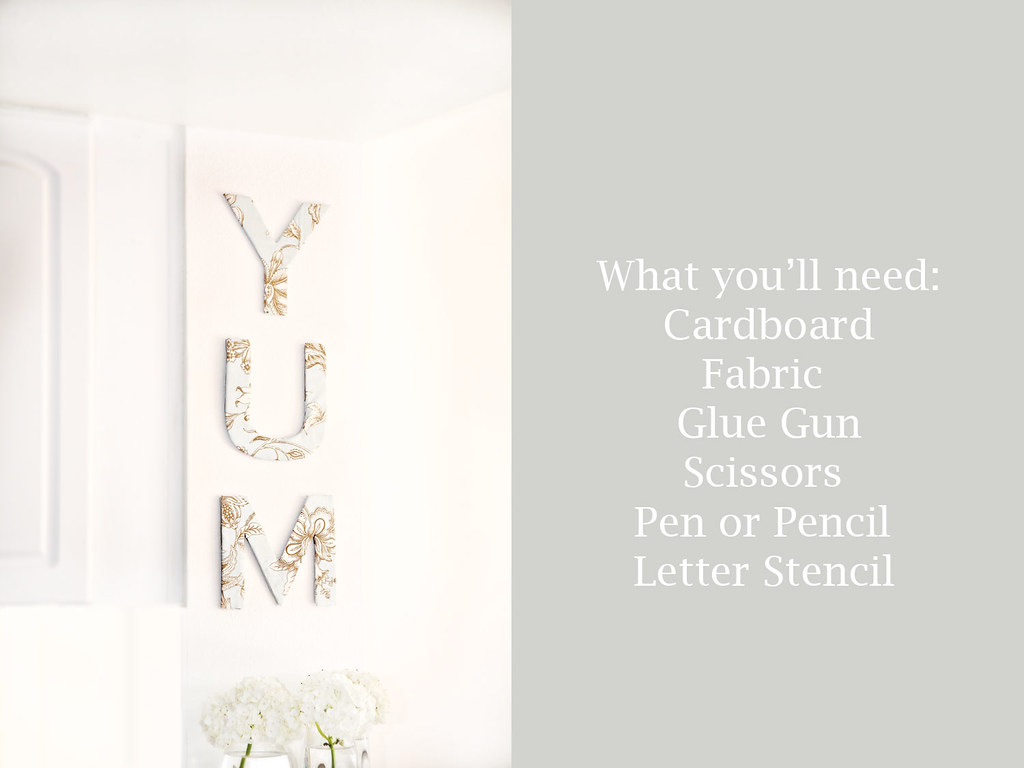
I had all of these things laying around my house, cardboard boxes from the move, leftover fabric and for the letter stencil - I just opened up Word on my computer typed a "Y" increased the size to as big as a full page, picked the font I liked and printed it out then did the same for the "U" and the "M."
Start by choosing your fabric - I have no idea how much you'll need but a yard should be more than enough depending on what you want to spell out {see? a pro crafter would tell you exactly how much you need.}
Print and cut out your letters, trace them onto cardboard then cut them out. Then using your cardboard trace them onto the back of your fabric and cut that out. When tracing onto the fabric get sloppy and trace about an inch larger than the actual size of the letter you'll be making.
Lay your cardboard letter onto the wrong side of the fabric, glue your fabric around the cardboard {just like wrapping a present} Now I'm sure some people would think you can use a sewing machine for a project like this but I wouldn't even know where to begin with a sewing machine....soooo we glue. and glue and glue. And try not to burn your fingers! The glue is HOT.
Pull tight on the fabric as you're wrapping and gluing so you have a nice smooth surface on the front of your letter.
To make my letter a little sturdier I went back and cut out another letter from cardboard, this time smaller than the original and glued that to the back of my letter to make it a little firmer and to hide all my sloppy glue work.
Repeat steps for each letter, hang and enjoy!
Tip: Before hanging the letters I put them underneath my heavy printer to smoosh together while the glue dried overnight.
7 comments:
Wow, this is too cute! I'm adding this to this to the list! Thanks for sharing!
I love this! Adding this to my craft to-do list! Thanks for sharing!
I'm going to jot this project down right under my herb garden project. Then I'm going to torture my boyfriend and ask him to help me decide what word to write out. I love your "YUM" -- I even think it's better than "EAT". Because you don't just want to eat, you want it to be yum too. If I start posting pics of words in every part of my home, promise me you'll send a stern email telling me to stop.
Hope you're having a wonderful weekend!
Were getting ready to re-do our kitchen...and the ONE thing that I know is going to be in there is the word EAT! I love seeing it in the kitchen on Cougar Town...I'm just going to buy the pre-made letters at Joanns and then cover them in fabric.
I like that you used the word YUM instead of Eat!
Thank you everyone!!
yum! i love it. you're so creative. very cool...
This turned out soo cute! I love that you used YUM and I love the fabric you selected! Also I love Cougar Town and Anthro, so nice work lady!! XOXO
Post a Comment